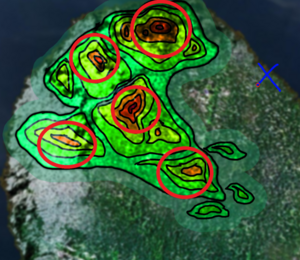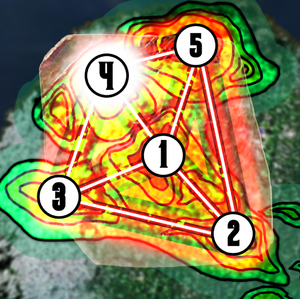
Hero Participants[edit | edit source]
Heroes in Bold were a part of the fight from the very beginning, having made their first appearance during Three Dragons on Synàra or earlier.
Crystal Peak
Amethyst Peak
Sapphire Peak
- Spinel (Ascended to Thane)
- Clank
- Shnek
- Violet Lorinda
- Felicia
- The Autom Lord (Formerly known as Vessel)
- Vyuprax
Topaz Peak
Emerald Peak
The Ceremony[edit | edit source]
Following ancient instructions found in the Amethyst Tome, the ceremony to resurrect Sardior was as follows: The ritual to resurrect the Ruby Court of Sardior and the summoning of his holiness requires great precision, dedication, and a deep connection with the mystical energies of the five sacred gemstones. Before beginning the ritual, ensure that you have gathered the following items:
Required Items[edit | edit source]
1. A large corundum egg
2. The ancient Amethyst tome of the court
3. An emerald weapon, preferably bladed
4. A well of lunar essence
5. A topaz map of the heavens
Steps of the Ritual[edit | edit source]
1. Choose a Site[edit | edit source]
a. The ritual requires the five items to be located no closer than 5 kilometers in distance, to allow ample room for celestial energies and resonant beams of summoning.
b. The items must be exposed to the open sky and have a direct line of sight to each other. The closer to the heavens the items can be, the better. Adjacent peaks of a tall mountain range provide the most suitable environment for the successful summoning of the court.
2. Preparations[edit | edit source]
a. (Optional) Around one or more of the items, set up a 5-foot radius circle of protection around the area using salt, crushed amethyst, and powdered corundum. This functions as Protection from Evil and Good for anyone near or touching the item.
b. **The Amethyst Tome:** From the highest point of the ritual, and with a clear line of sight to all other points of ceremony, lay the ancient amethyst tome open to the pages containing the sacred incantations. Light candles made from crushed rubies in beeswax around the tome to illuminate the hidden passages.
c. **Topaz Map:** Align the Topaz Map with celestial bodies above Quelmar to pinpoint the precise moment of the ritual's climax, ideally during a full moon. The alignment ensures optimal astral energy flow.
d. **Lunar Well:** Position the Moonwell to the east of the Topaz Item. Fill it with pristine water from pure sources, and place a moonflower at the bottom of the well to enhance its lunar energy.
e. **Corundum Egg:** Place the corundum egg on a cushion to the west of the Topaz and Lunar items. Anoint the egg with a mixture of myrrh and dragon's blood resin to awaken its latent power.
f. **Emerald Weapon:** Keep a brazier lit somewhere to the north of the other artifacts, but at no higher height than the Amethyst Tome. Heat the emerald blade over its fire until the end of the ceremony, where it will require wielding.
g. Keep a Court Candidate within 30 feet of each item in preparation for later steps.
3. Attunement[edit | edit source]
Once all sacred artifacts are in position and preparations complete, the Amethyst representative begins the ritual using the tome’s incantations. Suitable court candidates within the ceremony’s influence will hear the incantations in their mind. A candidate can then attune to an artifact, but no two creatures can attune to the same artifact simultaneously.
To attune, a candidate must:
- Stand within 30 feet of the artifact.
- Use an action to attune, focusing on the artifact and visualizing the Ruby King rising. The candidate is now concentrating on attunement (follows standard concentration rules).
- If attunement is broken, the candidate must restart the process.
4. Reunion[edit | edit source]
a. Each time the five artifacts synchronize (all 5 attuned simultaneously), a surge of power ripples out, dealing 10d8 psychic damage (DEX save DC 15 for half damage) to all creatures within 30 feet.
b. The court's empowerment requires three synchronizations. Each synchronization strengthens the link and brightens the corundum egg.
c. On the third synchronization, court members take their final form, growing in size, strength, and power. (DM Note: If the candidate is a PC, they die and are reincarnated as a gem dragon.)
5. Rebirth[edit | edit source]

After the Reunion, the egg’s ruby glow becomes blinding (DEX save DC 18). The egg must be broken using the Emerald Weapon. Upon breaking, the egg releases a brilliant light, heralding Sardior’s rebirth and the resurrection of the Ruby Court.
The Battle[edit | edit source]
The battle took place over many miles of mountain side, with heroes jumping across mountains to where they were most needed.
During the battle, the heroes had access to a small number of Airship skiffs (what started as 3 skiffs and was taken down to 2). These skiffs allowed the heroes to jump between the 5 mountains to try to reinforce where Towie and his shadow forces were hitting the hardest.
However, a number of times during the battle, heroes at certain peaks could not escape the danger they were in, as the skiffs were elsewhere. This lead to the death of heroes like Bosco and Drang, who had no escape when Flame bore down on them.
Phase 1: Clear the Peaks[edit | edit source]
This phase of the battle involved clearing the area around the mountain peak of any shadow monsters, enemies, or other problems so that the ceremony would be able to start simultaneously. That involved fixing the Proxy Dragon, fighting off Flame who had just been removed from Silent hours before, or taking out some Shadow Legionnaires, leftover from Towie's advancement into the Shadow Forge. Not only that, but when Tiamat heard word of the Sardior ceremony, she also sent a number of large dragons to fight off the heroes, leaving the team on Mountain 4 to also fight off some adult black and blue dragons.
Result:
- The Proxy Dragon was irreparably destroyed, could not be used in the ceremony
- The Chromatic Dragons of Tiamat were driven away
- Venaleth was convinced to take the Thane seat
- Flame was slain
- Only 1 skiff destroyed.
- The massive and largest airship [TODO: Name?] weighed anchor out of Gammelgard with all of its powerful cannons to take on Towie himself.
Phase 2: Begin the Ceremony:[edit | edit source]
With the Ceremony beginning, The One That Waits made himself known, and began his last attack on the heroes. Because he was truly one with the shadows, he was impossible to kill, as he would reform from the motes of shadow ichor moments later, typically on another mountain peak.
Perspectives[edit | edit source]
TODO: Find PC pages which talk about the battle.
